*This post may have affiliate links, which means I may receive commissions if you choose to purchase through links I provide (at no extra cost to you). As an Amazon Associate, I earn from qualifying purchases. Please read my disclaimer for additional details.
If you are working on electrically-powered devices in your home or shop, you need to know what kind of contact to use or what kind of contact you are working with.
If not, whatever you’re working on may not work right or up to its true capacity. This is where the differences between dry and wet contacts come in.
The difference between wet and dry contacts is how and when the contact gets electricity flowing through it. Dry contacts are relay contacts isolated from the source of electrical voltage. They do not supply voltage; they just detect whether a switch is open or closed. Conversely, wet contacts have one pole that is hot (or “wet”) all the time, passing voltage as soon as a relay closes.

This terminology – and the distinction between them – is a common cause of confusion, even for the experts.
Browse online and you are sure to find plenty of electrician forums like this one discussing the exact meaning and differences between dry and wet contacts.
In this article, we’ll try to bring some clarity to the topic by answering some common questions and providing examples.
Table of Contents
What Is a Dry Contact?
No products found. are a volt-free contact that does not supply power from a shared source to the control.
Dry switching is looking for contact currents that have less than one mA. You must supply your own power since these contacts are bare, with no energy.
This type of contact looks like an electrical switch. When the switch on a dry contact is open, then it is normal. When it is closed, then that is when you need to look into the problem.
Gold can be used as the material on the contact, which is meant to remain clean. These types of contacts will have a certain voltage and a limit that belongs to it. There are other materials to have the contact tips made of:
- Gold and Silver: Help against corrosion and used for low-voltage circuits.
- Silver Palladium: More costly and is more durable.
- Silver Nickel: Protects against arcing and is equal in electrical conductivity to silver.
- Silver Tungsten: Not resistant to corrosion, and it is not a precious metal.
- Silver Cadmium Oxide: It is good against wear and tear and arcing.
- Silver Copper: Great for resistance against wear and tear and is considered a hard silver with a higher contact resistance.
- Fine Silver: Contacts can become damaged quickly. Cost-effective and has low contact resistance. Are heavy channelers of electricity and thermal heat.
Materials that have low contact resistance can be oxidized by the air, and that can cause them to close instead of opening when needed.
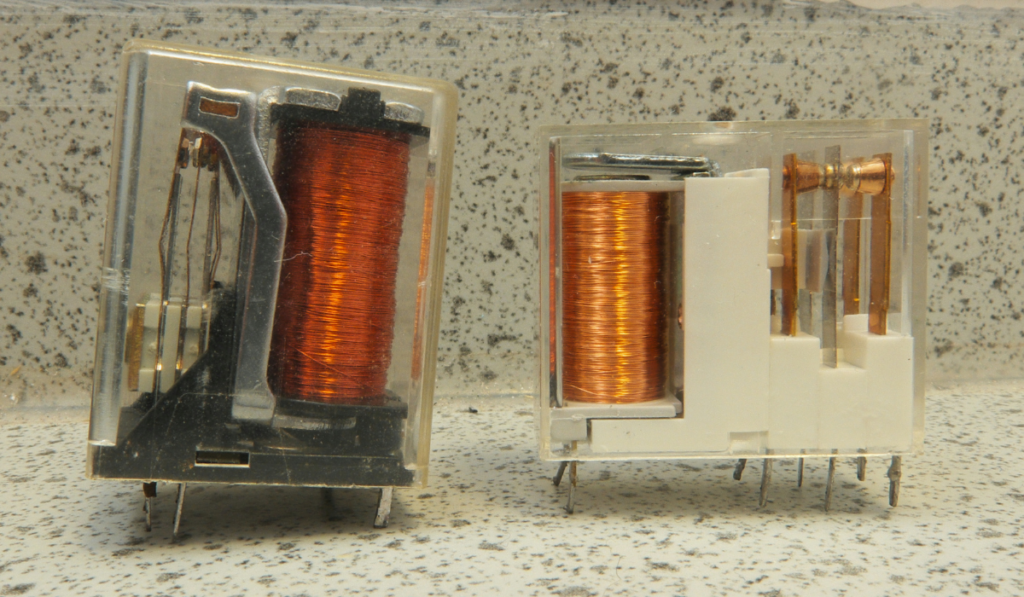
Types of Relays
A relay that you will use with these contacts are switches that are controlled electrically. They tell the contacts when it needs to be opened and closed.

A single relay has a coil of wire that is wrapped around a solenoid. Then there is an iron yoke and an armature with two sets of contacts.
When a number of electric currents go through the coil, that starts the armature, which then leads to the contacts. This current through the contact will then provide a connection to the device.
There are different types of relays you can use:
- Electromagnetic: This relay can be AC and DC. It is made out of electrical, mechanical, and magnetic pieces.
- Solid State: Uses solid-state units that do switching operations that do not move any parts.
- Hybrid: This includes both the output of an electromagnetic relay and the input of an electronic component.
- Thermal: If the heat rises past the limit, it will help to switch the contact from one position to another. They are used mainly for motor protection.
- Reed: They have a pair of magnetic strips that are inside a glass tube. The reed can pose as an armature and a contact blade.
Dry contact is used for most of the devices in our homes. However, why do they call it dry contact?
Why Do They Call It Dry Contact?
Relays that are needed for dry contacts, either energizes or de-energizes when there has been a change to their input. This helps the dry contact to learn if the input switch is opened or closed.
The voltage that supplies the energy to the relay can be brought to it by using a separate line of wires, or it can use a local power source near the relay.
Since you now know about dry contacts, there are also wet contacts to learn about.
What Is a Wet Contact?
A wet contact uses a relay device, and when it is activated, it will supply a voltage to the device that is connected to the relay.
Wet contacts and dry contacts are not interchangeable. If you use a relay for dry contacts, and then you use it for wet contacts, that relay will no longer work for dry contacts.
Using that relay again for a dry contact will cause your devices to malfunction.
The decision in different contact materials will let you know whether or not you will be using it for wet or dry switching. You want to use a material that can hold its own to arcing when the contact wants to receive power and close off.
Arcing happens when an electrical current moves between two conductors. This allows for an electrical disruption of gas that brings a continuous electrical discharge.
If the contact does not have the correct materials around it, the process of arcing could cause a fire.
Mercury is used for wet contacts. Mercury has the ability to absorb heat better. Heat is caused by large rushes of currents.
Now that you are able to decipher what a wet and dry contact is, it is now time to learn how to wire it.
How To Wire a Dry Contact Relay
Any relays you want to install should be done professionally by an electrician. When you are ready to install the relay, you should think of the distance it is from the hub and the occurrence of other objects that may interfere with the signal.

There are steps to ensure that they are correctly put in place:
- All low-voltage wiring should be done with the power turned off to the logic board that will protect everything from any shorts.
- Class 2 is the wiring level for all low-voltage wiring. The low-voltage wiring should run in a separate conduit from line-voltage wiring.
- Take note of all of your wiring and device locations so that the contact can be properly put together.
- Connect the power supply to the relay terminal and then the relay contact to the needed circuit with wires.
Try not to install a relay in the following places:
- On the outside of the premises
- Inside metal junction boxes and electrical breaker panels
- In certain areas that go below or above the temperature and humidity needed for the relay
Be sure to stay safe and follow safety rules when it comes to installing electrical devices in your home, business, or elsewhere.
Once you have an idea of how to wire your contacts, certain devices require either dry or wet contacts.
Examples of Devices That Use Dry Contact Versus Wet Contact
You should use either wet or dry contacts for certain devices. Should you use the wrong contact, the device may not work properly or up to its full potential.
Dry Contact
Dry contacts are used for outputs that belong to alarms. These devices are used for dry contacts:
- Fire alarms
- Control relays
- Fans
- Lights
- Horns
- Valves
Wet Contact
These devices are used when there are different numbers needing to be received from the sensors:
- Thermostats
- CO2 Sensors
- Humidity sensors
- Flow sensors
- Pressure sensors
Resources:
- https://homeguide.com/costs/cost-to-replace-electrical-panel
- https://groverelectric.com/assets/downloads/howto/04_200%20&%20400%20Amp%20Services.pdf
- https://www.blackbox.nl/en-nl/page/27098/Resources/Technical-Resources/Black-Box-Explains/security/dry-contacts
- https://www.hvacrschool.com/what-are-dry-and-wet-contacts/
- http://www.electricianatlanta.net/what-is-electrical-arcing-and-why-is-it-dangerous/
- https://www.energyavenue.com/forms/INV/8189RS237.pdf
- https://www.electronics-tutorials.ws/io/io_5.html
- https://www.elprocus.com/different-types-of-relays-used-in-protection-system-and-their-workings/